Friday, March 18, 2011

First Butterfly of the Season...

I was just taking a quick break from work and walked outside, only to see our first butterfly of the season!

After running inside to grab the camera I snapped this quick picture to show you...It's a Zebra Swallowtail...she was puddling (drinking) from a little muddy, wet spot in the yard ~

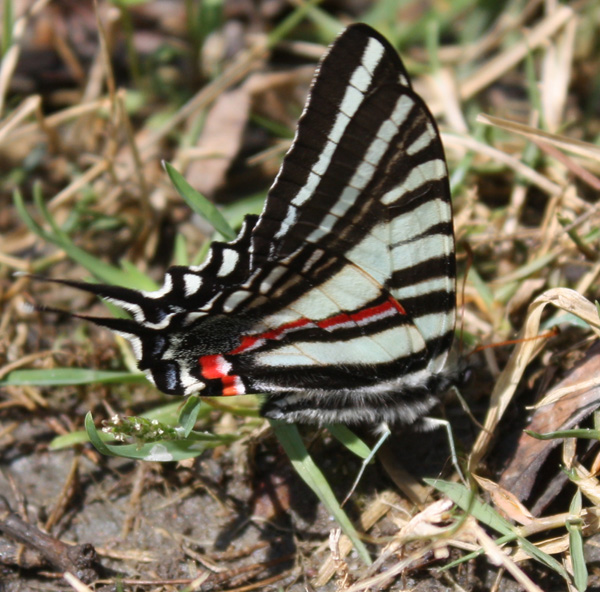
The Zebra Swallowtail's host plant is the paw-paw tree, so it means that we must have one nearby...tomorrow I will take a walk through the woods and see if I can find it!

Woo hooo!! Now the fun begins :o)

Wednesday, September 22, 2010

Amazing Monarch video...

Here's a link that my friend Denese sent me today ~ It's amazing video and a wonderfully written article by Julie Zickefoose, a writer and watercolor painter who lives on a 80 acre wildlife sanctuary in the Appalachian foothills of Ohio about the Monarch butterflies who lay eggs every year on the milkweed plants around her pond ~

Monarch Video & Article

Make sure you watch the video to the end, so as not to miss the butterfly emerging from its chrysalis! It's fabulous :)

Saturday, September 11, 2010

No caterpillar left behind...


Well, our happy little Fritillary caterpillars have been munching away all season and although I didn't think they could do it....they have eaten every last bit of our very large, lush passion vine!

Oh no! There's nothing worse than hungry, hungry caterpillars! Fortunately I spotted a lovely passion vine near the pond, so we decided to move the little guys to their new buffet :o)

The stripped Passion Vine!


Clyde is collecting all the little guys {doggies are helping}.


Hooray!
Our new passion vine home...let's eat!


A happy Gulf Fritillary Butterfly!
{probably getting ready to lay MORE eggs}
The silver spots on the wings undersides make her easy to identify...

Caterpillar rescue accomplished!

My walk by the pond...

As I was walking by our pond this morning I noticed a small willow tree growing by the waters edge and as I looked closely I couldn't believe it...there were two Red-Spotted Purple butterfly caterpillars!

I ran back to the house to get the camera {you would think by now that I would ALWAYS carry my camera} and took a couple of pictures to share with you...


The caterpillars look kind of like a bird dropping {good camouflage} and love to nibble on tender willow leaves.
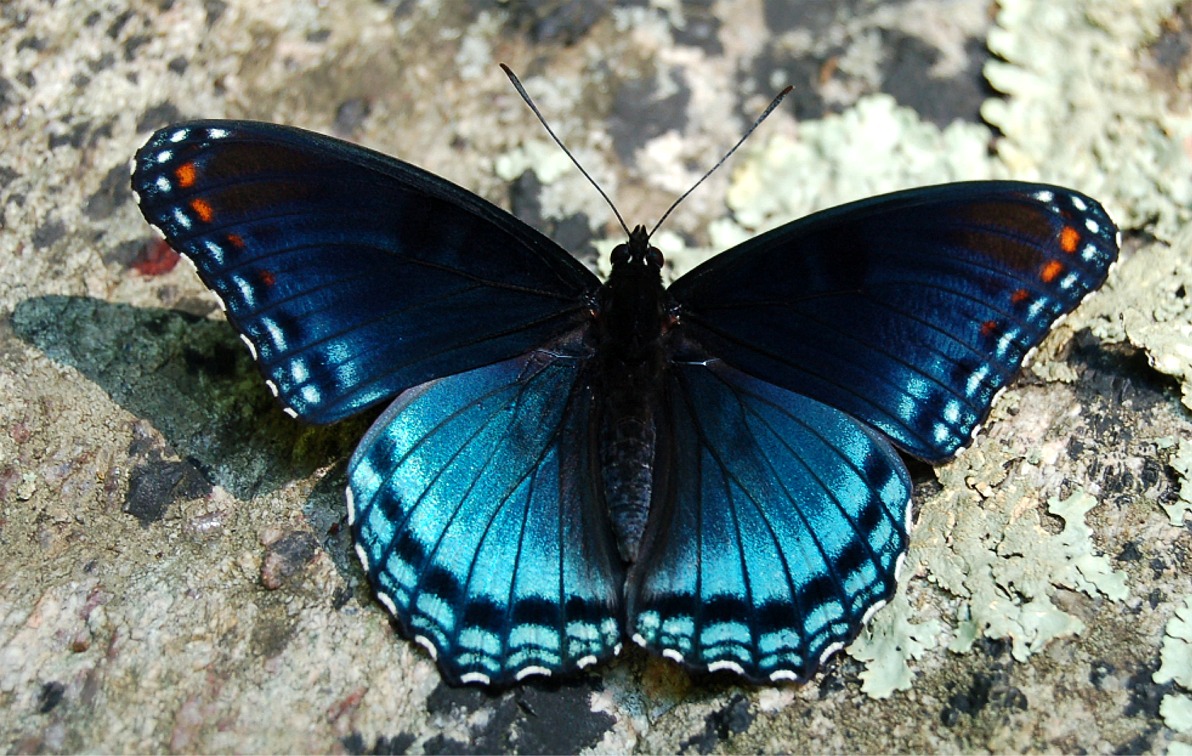
I frequently find the adult butterflies sipping sap from the trees or visiting my "rotting fruit" trays in the garden.


They usually drink with their wings open, showing off the beautiful iridescent blue color, however if you ever get a glimpse of the underside of their wings you will see the striking bright red/orange spots for which they were named!


Such a fun way to start the weekend!

Friday, September 10, 2010

My first Question Mark...


Yay!


I'm so excited!


I just spotted my very first Question Mark caterpillar on a little elm tree by the creek on my walk with the doggies this morning!

I'd only seen pictures in books, so this was quite thrilling {ok...I know I'm such a nerd}.

If you disturb it, the caterpillar looks like the punctuation mark it's named for. They love to munch on elm trees, hop vines and hackberry trees.


The adult butterflies prefer to sip juices from rotting fruit, tree sap and animal droppings {yuck!}. You can often find them perching, head down, on the side of a tree trunk.


I just love their wing shape..it kind of looks like a ragged old leaf...very cool!


With any luck, I may find a chrysalis on this afternoon's walk!

Tuesday, August 31, 2010

The best butterfly day...


Well, I've had no luck finding any Wild Golden Alexander for my Black Swallowtail caterpillars ~ Today it looks like they've abandoned what is left of the parsley and fennel to venture out on their own in search of food...I hope they have better luck than me.

But yesterday was the single most fantastic day I've ever had for spotting butterflies in my garden! I saw 14 different types:

Gulf & Variegated Fritillary, Monarch, Eastern Comma, Question Mark, Pearl Crescent, Red Admiral, Buckeye, Black Swallowtail, Tiger Swallowtail, Clouded & Cloudless Sulphurs, Red Spotted Purples and a Hackberry Butterfly {for the first time ever}!

I was absolutely amazed! They were all {with the exception of the Hackberry Butterfly, who was sipping sap from a tree} nectaring in my overgrown butterfly garden...I really am beginning to think that the butterflies just don't care about the weeds...yay!

I love my garden :o)


Wednesday, August 25, 2010

A Backyard Safari...

While I was searching for a wild Golden Alexander plant for my Black Swallowtail caterpillars in the yard today, I came across something that I just had to share with you ~

I saw what looked like a hummingbird, dangling upside down, from a vine, with it's throat slashed...it's little feet still clutching the vine...so, so sad :(

I couldn't imagine what had happened to it...until my husband noticed a GIANT 8 inch praying mantis right next to the bird...I did a little research and came across an article in Birdwatchers Digest about a praying mantis killing and eating a hummingbird {I didn't have the heart to take pictures of our hummingbird, but there are photos in the article...so if you're squeamish, don't look}


But here's the killer praying mantis from our yard...

I also spotted a baby Saddleback Caterpillar on one of our Tulip trees today too! I have read that their sting may be the most potent of North American caterpillars ~


So although I'm still on the hunt for caterpillar food, I feel like I've been on an afternoon safari in my own backyard!

Sunday, August 22, 2010

Oh nooooo! I'm running out of fennel...


Good news and bad news... I checked on my one lonely little fennel plant that's standing in the garden and the good news is that it's loaded with Black Swallowtail baby caterpillars and eggs!

The bad news is that while I'm terribly excited to have so many Black Swallowtails, I don't think one little plant can feed 15-20 hungry caterpillars ~ And I'm afraid to buy a fennel, parsley or dill plant for fear that the nursery may have sprayed it with insecticide and it's too darn late to plant seeds and have them grow in time to be a meal for these little guys....what to do?

I guess I'm going to have to go in search of something that grows in the wild....I did some research today and found that Golden Alexander grows in our area {it's in the carrot family and Black Swallowtails like anything in the carrot family}. So armed with my wildflower field guide, off I go!

Keep your fingers crossed! {Gotta save the baby caterpillars!}

I'll keep you posted :o)

Tuesday, March 9, 2010

Woo Hoo! I'm finished...


Oh my goodness...I can't believe that it's been almost 2 weeks since I've spoken to you! The weather is getting warmer and I can feel my spirits being lifted as spring finally approaches.

But the most exciting thing, is that I just finished up my kids line of scatter gardens! It all took longer that I thought {it always does}, but I think the packaging is as cute as it can be and hope everyone else thinks so too!

Retail stores have already started ordering just in the few days since I've launched the products! So I feel quite optimistic {of course I usually am a "glass half full" kind of girl...}

I thought I'd share the package designs with you today and then later in the week get back to butterfly gardening...


I'm probably most excited about the Secret Sunflower Clubhouse. I grew one last year with the kiddos and they enjoyed it so much, that I just had to add it to the product line~ You plant Mammoth Sunflower Seeds in a 6x6 foot square {leaving an unplanted space for the doorway}, to create a living play-space. But in the kit, I've added a dwarf fescue {grows to just 4 inches} and little blue cornflowers to create a soft "floor"...perfect for picnics & teddy bear tea parties! And when the sunflowers are 6-7 feet tall, you can pull the tops together with twine to create a roof, if you desire!


I also thought the "Good Bug Garden" was really fun too! It's a garden designed to attract & provide a pollen source for ladybugs.

I was reading about ladybugs the other day and learned that ladybug eggs look like tiny orange footballs and are laid on the leaves next to aphids, so that when they hatch they will have their first meal waiting for them!


Also, they don't look like lady bugs when they hatch...they look more like tiny black alligators with orange spots. They grow to 1/2 inch long in about 2-3 weeks, then pupate {form a chrysalis, like a butterfly caterpillar} and a few days later they emerge as the lady bug that we recognize! In order for lady bugs to mature and lay eggs, they need nectar and pollen sources. Isn't that crazy! I had no idea...


Nature always amazes me and I can't wait to learn more...what a fun journey we will have together this summer!

Tuesday, February 23, 2010

Bad, bad doggie...

Our lab puppy {and I use that term lightly...he's two} is just so naughty! We actually had a fairly warm, sunny weekend & I was outside, planting my wildflower garden, wearing my favorite shirt when out of nowhere Jackson appeared, leapt through the air, mouth wide open...clamped on to my shirt and kept on running! It was like something out of the movies...there I was, standing in the garden, half my shirt gone...the rest in tatters...I could not believe it!! I've never seen anything like it...he is a such a bad, bad doggie...it's a good thing he's cute!

On the upside, I did get my wildflower garden planted {right behind my raised beds} and tidied up the garden a bit, scanning the ground for any sign of green peeking through the soil...nothing yet.

This afternoon, I was looking at all the butterfly/caterpillar identification books that I have on my desk {15} and realized that each book provides something different.

Some have better pictures or show different "instars" (stages) of the caterpillars and I really do refer to all of them, however I've found one that I go back to time & time again...It's a book by Judy Burris & Wayne Richards, called "The Life Cycles of Butterflies"

It won the Teachers' Choice Award in 2007, but I think it's a wonderful "adult" book as well! They have taken 23 of the most common butterflies and devoted four pages to each butterfly with amazing photos of the eggs, caterpillars and butterflies. It also has a section devoted to butterfly gardening...host & nectar plants.

But I think my favorite feature is the easy comparison guide for butterfly eggs, caterpillars, and chrysalises (cocoons) in the back of the book. I actually carry it with me when I'm egg & caterpillar hunting...yes, it's that good!

I have it in hardcover, but bought a paperback version {every bit as good as the hardcover} for my Mom on Amazon.com for about $11 {& free shipping!}

So, if you are thinking about adding a butterfly identification book to your collection, I would highly recommend this one!

Think happy spring thoughts...it's just around the corner, I can feel it!

Wednesday, February 17, 2010

Luckest Girl...

Sometimes I feel like the luckiest girl in the world! I returned home this morning from Jazzercise and found that my husband had done the dishes {that I really meant to do last night before bedtime} AND he had written directions {with sketches, I might add}, for the raised beds that I wanted to share with you today...I feel so loved!

If you're like me, you want a garden that looks pretty and is easy to care for, without spending a fortune. So, with that in mind, last fall, we built some raised beds in anticipation of expanding our butterfly garden this spring.

Since we live in Georgia, much of our yard is hard clay, so by building raised beds we find planting much easier. Also, I run drip hoses in the beds, under the soil to conserve water and help the plants develop a deep root system. And a good root system makes your little plants more drought tolerant during the summer's scorching heat.

Here are directions for the easy, small raised bed that we built. {I'll share the directions for the larger one later}

We built six of these 2' x 2' beds in an afternoon.

What you will need:

Two 5/4" Deck Boards
One 2 x 2" board - 8 feet long
32 Wood Screws 1 1/2"

First, cut the deck boards into 2 foot lengths (8 pieces). Then cut four pieces of the 2 x 2"board, 11 inches long each.

1. Position two of the boards, as shown and secure with 2 screws in each board to the upright 2x2.

2. Position two more boards and repeat step 1

3. Repeat for the second level, alternating the way the boards overlap.

4. Fill with 2 bags of potting soil!

The cost for building each bed is about $10 and should last 8-10 years!

We happened to be replacing some of the boards on our deck, so we just recycled the old boards for our raised beds...Cost: Free! {I love free!}

I'll take pictures of my new raised beds this summer when they're in full bloom, to share with you. So, be sure to take pictures of yours too...I'll post them here, so that we can see everyone's beautiful summer gardens!

Monday, February 8, 2010

In the middle of the night...


Have you ever woken up in the middle of the night with total clarity of thought? Well, that's exactly what happened to me last night. I was sound asleep and then like a bubble...I felt myself rising to the surface, then "pop", I was awake. And the second I woke up, I realized that with all my moaning about winter & the yucky weather, I had completely forgotten to tell you that if you're starting your butterfly garden from seed this year... it's time to start now!


Many of the plants that you will want to include in your garden, are perennials (they come back each year) and can be started from seed. It just takes a little advance planning, but will save you loads of money! The reason that you need to start now is "stratification". All stratification means, is exposing your seed to a period of cold, before planting. This will help the seed break its dormancy and germinate when the warm weather comes.


So, you have 2 choices, when it comes to stratifying...one is to plant in the fall and let the seeds overwinter and the other is to stratify in your refrigerator for 4-8 weeks before planting. Since winter will be over soon, we're going to use the refrigerator method. We should have just enough time...whew! {I can't believe I almost forgot to tell you about this...sorry}

Ok, here's how I do it. I mix the seeds with equal amounts of damp sand or potting soil...{damp, but not so wet that water will squeeze out of it} Then place the mixture in a sealed plastic bag and store in the refrigerator. The closer to eight weeks, the better, however I've had good luck with four.


Some of the flowers that you may want to start from seed are:

Swamp Milkweed & Butterfly Milkweed (for the Monarchs...)

Purple Coneflowers (nectar plant for all butterflies & host plant for the Silvery Checkerspot Butterfly)

Wild Senna & Partridge Pea (host plants for Sulphur Butterflies)

Purple Passion Flowers (Host plant for Zebra Longwings, Gulf & Variegated Fritillaries)

The other really great thing about all these flowers, is that at the end of the season, you can harvest the seeds! Just wait until fall, let the seed pods dry on the plant and then collect!


I love sharing seeds from my garden with family & friends... it makes a great gift from the heart and helps the butterflies at the same time!


So, you may want to save some money and start planning your butterfly garden now. Go ahead and buy your perennial seeds, put them in the refrigerator and relax knowing that when spring arrives your little gems will be ready to plant and grow!

If you have any problems finding seeds at your local nursery, you can find some of the varieties on the website under "Butterfly Garden Kits".

Happy stratifying!!

Thursday, February 4, 2010

Spring is coming...

Oh my gosh! I was out walking the dogs this afternoon and I noticed that my Snowdrop flowers are coming up! I know this has nothing to do with butterfly gardening, except that spring really is on its way and soon it will be butterfly season! Hooray!

These particular Snowdrops have a special meaning, because my mother-in-law, Stella dug them from her garden for me, before she passed away. So I think of her each year, as the green shoots pop through the soil. I'm always so surprised to see them, because usually they appear when the days are still cold and dreary and thoughts of spring haven't yet entered my mind.

I also find it interesting, that in ancient times, the snowdrop flowers were a symbol of hope. So, I guess, it's quite appropriate that I feel so optimistic, when I see their little heads appear!

Warmer weather and beautiful sunny days are on the way...I can't wait!

Monday, February 1, 2010

Monday morning...

Well, today was off to a rocky start...running late, car on empty {ok, that was my fault...I did notice it was running low yesterday, then promptly forgot}, ice on the windshield, {again, my fault...forgot to put the car in the garage}, but none the less I managed to get to jazzercise in enough time to take my coveted spot in the back row, where I could comfortably work out my chubby little body, relatively unnoticed. So now, here I am, cozy & warm at my desk, looking forward to sharing with you today...

I was thinking about how much fun it was the first time I spotted a caterpillar in my garden, was able to identify it & didn't squish it. It was a Black Swallowtail butterfly caterpillar on my Dill.

I had just learned that you need more than nectar plants in your garden to attract butterflies. You need "Host Plants".

Host plants are the plants where the adult butterflies lay their tiny eggs and what the baby caterpillars eat. Each species of butterfly caterpillars will eat only a very specific group of plants {I used to think that caterpillars would eat any green leaves}.

And as luck would have it, I just happened to have Dill growing in my garden last summer. Which just happens to be, (along with Parsley & Fennel) one of the host plants for Black Swallowtail butterflies!

So, I dashed up to the garden and started to look. At first I didn't see anything and then I noticed one of the plants was missing most of its leaves and there, on an almost bare stock, was a fat green, yellow & black caterpillar! A Black Swallowtail!

Well, I immediately dug up the plant, caterpillar and all & put it in a pot, in a cage, on the back deck...it wasn't until later that I realized I could have just snipped off some of the leaves to feed the little guy and not the entire plant. Anyway, I had such great fun watching him grow, eventually turn into a chrysalis and then a butterfly. It was my first "wild" caterpillar!

So, if you would like to add just one host plant to your garden this year, you might want to consider Dill, Parsley or Fennel.

Just be sure to either grow it from seed, without using pesticides or buy an organically grown plant. I will grow mine from seed again this year, just to be on the safe side. But the good news is that the seeds aren't hard at all, to grow! Just pick a sunny spot, rake the soil lightly, sprinkle the seeds and keep moist! And don't forget to plant your nectar flowers close by, the Black Swallowtails will love you for it!


Thursday, January 28, 2010

Standing in the Garden Center...

When I woke up this morning {quite early, I might add, complements of Leo... our Black lab... thumping his tail like a one-dog rhythm band}. I thought of a helpful butterfly gardening hint that I wanted to share.

I usually end up at one of the mega garden centers to buy plants. And when I first started my garden, I would shop, armed with my list of recommended butterfly nectar plants. But because I didn't know what the flowers on my list actually looked like, I would find myself confused by the endless varieties, wondering what to buy. And let's face it, the employees are usually busy and sometimes it's hard to find a knowledgeable person to help.

I used to think that the brighter or prettier the flower, the more butterflies it would attract. But I found, that this just wasn't true.

Then one day, as I was trying to decide, I noticed that there were bees and a few butterflies, hovering around a particular group of plants and it occurred to me that this might be a great way to choose nectar flowers.

That's when I started just standing and watching...and the plants with the most bee & butterfly activity are the ones I would buy!

So, when you're choosing flowers, don't be afraid to just stand back and watch for a moment...and if you see a women standing in the middle of the garden center, watching too, come over and say hello, because it's probably me, deciding on the next nectar flower for my butterfly garden!

Monday, January 25, 2010

The sun is shining!

Yippee! The sun is shining today! We've had so much rain lately, that I think I was beginning to mold...

As I was driving to jazzercise this morning, I was thinking about what I would talk to you about today...Firstly, I just had to share how excited I am! This weekend Clyde & I had a brainstorm for a line of children's gardening seeds. It's totally cute and I know retailers will carry them (or at least I hope so!). As soon as I'm a little farther along, I'll share the packaging design with you. I can't wait!

Back to butterfly gardening....

If you are like me, you might feel a little overwhelmed at planting an entire butterfly garden all at once. I still can't remember the names of all the plants and what they look like, so I always think it's a good idea to start out simply.

If you buy one plant for your butterfly garden this year, let it be Purple Coneflowers (Echinacea Purpurea)! They are a terrific perennial (they come back each year) and butterflies just can't resist them.

Last summer I found a bunch on sale at Home Depot and went kind of crazy and bought 15 plants thinking that I would add them to the garden. Well, I got busy { and by busy, I mean lazy}, so rather than planting I just moved them, in their pots, to my back deck. I put them up on the railing and clustered them all together, so the butterflies could easily spot them.


Oh my gosh, I was amazed! I had so many butterflies on my deck, providing me with terrific photo opportunities! I got much better photo's than I would have, if the plants had been in the garden, mostly because I could take pictures right out of my kitchen window or set up my camera on the deck and just click away, if I had a few extra minutes... and the butterflies were always right there!

Then in the fall, when the potted coneflowers were starting do die back, I planted them in my garden, where I know they will reappear this year!

I will do this again this summer! I love having butterflies right on my back deck...and this gives me a good excuse to not have to immediately plant every new addition to the garden!